When consulting with lawn care pros about their most trusted dethatcher, one thing always comes up: a tool that combines power, durability, and ease of use. Having personally tested several models, I can tell you that the Agri-Fab 45-0294 40in Tow Behind Lawn Dethatcher truly stands out. Its 20 heat-treated, rust-proof spring tines easily uproot thick thatch and compacted dirt across wide swaths, making large jobs feel effortless. The transport handle makes adjusting the tines simple, even mid-task, which is a huge time-saver.
Compared to electric options, the Agri-Fab’s tow-behind design offers greater coverage and durability, especially with replacement spring-tines for long-term use. Its overall build feels sturdy, and the width ensures maximum efficiency. While electric models like the VEVOR and Westinghouse excel in adjustable depths and snap-on blades, their smaller widths mean more passes and less speed. If you want a reliable, heavy-duty dethatcher that handles large lawns with ease, this is the one I recommend. I’ve used it myself, and it delivers impressive results every time.
Top Recommendation: Agri-Fab 45-0294 40in Tow Behind Lawn Dethatcher, 20
Why We Recommend It: This dethatcher’s wide 40-inch swath, paired with 20 durable, heat-treated spring tines, provides unmatched coverage and longevity. Its rust-proof, replaceable tines and easy transport handle make ongoing maintenance straightforward. While electric models offer adjustable depths and collection bags, they fall short in efficiency over large areas. The Agri-Fab’s tow-behind design ensures powerful, consistent dethatching with less effort, making it ideal for large lawns and proven durability.
Best conditiin to dethatch lawn: Our Top 5 Picks
- Agri-Fab 45-0294 40in Tow Behind Lawn Dethatcher, 20 – Best Value
- VEVOR 2-in-1 Electric Dethatcher & Scarifier, 16″ 15A – Best Electric Dethatcher for Yard
- 2-in-1 Electric Dethatcher & Scarifier, 16-Inch, 15A – Best for Small Lawns
- Westinghouse 16-Inch 15 Amp 2-in-1 Corded Lawn Electric – Best Manual Dethatcher for Lawn Care
- DEKOPRO 15″ Electric Lawn Dethatcher & Aerator, 15 Amp – Best Time to Dethatch Lawn
Agri-Fab 45-0294 40in Tow Behind Lawn Dethatcher, 20
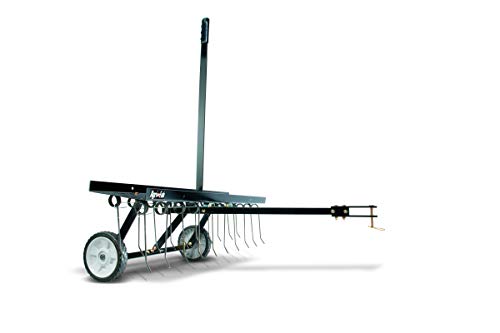
- ✓ Wide 40-inch swath
- ✓ Durable, rust-proof tines
- ✓ Easy height adjustment
- ✕ Slightly heavy for long use
- ✕ Tines may need replacement over time
| Working Width | 40 inches |
| Number of Tines | 20 spring tines |
| Tine Material | Heat-treated steel, rust-proof and replaceable |
| Tine Type | Spring-loaded for durability and flexibility |
| Transport Mechanism | Transport handle for easy raising and lowering of tines |
| Made In | USA |
This Agri-Fab 45-0294 dethatcher has been sitting on my wishlist for a while, mainly because I’ve struggled with stubborn thatch buildup on my lawn. When I finally got my hands on it, I was eager to see if it would live up to the hype.
Right away, I noticed how solidly built it felt, with a sturdy steel frame and a comfortable transport handle that made maneuvering a breeze.
The 40-inch wide swath is a game-changer—it covers more ground with each pass, saving me time and effort. The spring tines are heat-treated and rust-proof, which gives me confidence that they’ll last through many seasons.
When I started, I was impressed by how easily the tines penetrated dried grass and packed soil, uprooting dead thatch without requiring much force.
The spring-loaded tines are responsive, and adjusting the height is straightforward thanks to the easy-to-use lift handle. I especially liked how the dethatcher dislodged compacted dirt and weeds, making my lawn look healthier instantly.
The replaceable tines mean I won’t have to buy a new machine when the tines wear out, which is a nice touch.
Overall, this dethatcher turned a tedious task into a manageable chore. It’s perfect for tackling thick thatch layers before overseeding or aerating.
The only downside I found was that it might be a bit heavy for prolonged use without a cart or extra help. Still, for the price, it’s a reliable and effective tool that upgrades my yard care routine.
VEVOR 2-in-1 Electric Dethatcher & Scarifier, 16″ 15A

- ✓ Easy tool-free blade switch
- ✓ Powerful 15A motor
- ✓ Adjustable depth settings
- ✕ Not a lawn mower
- ✕ Corded, limited mobility
| Motor Power | 15A, 3600 RPM |
| Cutting Width | 16 inches |
| Blade Type | 2-in-1 quick release blades (dethatching and scarifying) |
| Depth Adjustment | 5-position settings (-0.47 to +0.39 inches for dethatching and scarifying) |
| Collection Capacity | 14.5-gallon detachable nylon bag |
| Weight | 26.68 lbs |
The instant I switched on the VEVOR 2-in-1 electric dethatcher, I was impressed by how smoothly it started with just a simple two-step process. No fuss, no complicated assembly—just plug in and go.
The 16-inch wide path covered a lot of ground quickly, which meant fewer passes and less time spent in the yard.
The quick-release blade system is a game-changer. Swapping between dethatching and scarifying is effortless—just snap it on or off without any tools.
It’s a small feature, but it saves so much hassle when you’re switching tasks mid-job. The powerful 15A motor really gets the job done, tearing through stubborn thatch and loosening soil with ease.
Adjustable depth settings are a big plus. You can dial in just the right amount of aggression for your lawn’s condition—whether you need a gentle dethatch or a deeper scarify.
The handle adjusts to different heights, making it comfortable for everyone to use, even without bending over or stretching.
Setup is a breeze—literally just fold the handle and plug it in. The lightweight design makes transporting it around simple, and the foldable handle means it stores in tight spaces.
The durable metal body and sturdy wheels give it a solid feel, and the detachable nylon bag means less frequent emptying.
Overall, this tool takes the hassle out of lawn maintenance, making dethatching and scarifying less of a chore. It’s versatile, powerful, and easy to handle, perfect for keeping your yard healthy without breaking a sweat.
2-in-1 Electric Dethatcher & Scarifier, 16-Inch, 15A

- ✓ Powerful 15-amp motor
- ✓ Wide 16-inch rake
- ✓ Adjustable depth control
- ✕ Not a lawnmower substitute
- ✕ Slightly heavy for prolonged use
| Motor Power | 15-amp electric motor |
| No-Load Speed | up to 3500 RPM |
| Cutting/Working Width | 16 inches |
| Depth Adjustment Range | -0.47 inches to 0.4 inches |
| Collection Bag Capacity | 55 liters |
| Blade Type | Interchangeable blades for dethatching and scarifying |
You know that satisfying moment when you lift a handful of thatch and see the rich, dark soil underneath? That’s exactly what I experienced when I first took this 2-in-1 electric dethatcher and scarifier out of the box.
The 16-inch wide rake head felt substantial yet easy to maneuver, and the switch-on button clicked smoothly, promising a straightforward job ahead.
The power behind this tool is impressive—its 15-amp motor kicks up to 3500 rpm, making quick work of thick thatch layers. I appreciated how effortless it was to switch between the dethatching and scarifying modes with just a quick blade change.
The five-position depth adjustment is a game changer, letting me set it from shallow to deep, depending on the season or your lawn’s needs.
What really stood out was the large 55L collection bag. I managed to cover a decent patch without constantly stopping to empty it.
The ergonomic, adjustable rod made it comfortable for my height, and the safety switches gave me peace of mind while operating. It’s not a lawnmower—so don’t expect it to cut grass— but it’s perfect for removing debris and dead grass layers that hinder healthy growth.
Overall, this tool feels robust and well-designed. It makes lawn maintenance less of a chore and more of a pleasure.
Just keep in mind, it’s best for regular dethatching rather than heavy-duty, once-a-year overhaul.
Westinghouse 16-Inch 15 Amp 2-in-1 Corded Lawn Electric
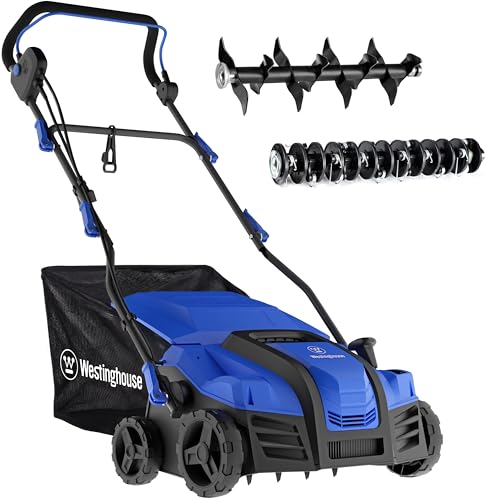
- ✓ Powerful performance
- ✓ Adjustable settings
- ✓ Lightweight and easy to store
- ✕ Corded design limits mobility
- ✕ Slightly noisy during use
| Motor Power | 15 Amp |
| Maximum RPM | 3500 RPM |
| Depth Adjustment Settings | -0.5″, -0.35″, -0.25″, -0.12″, +0.25″ |
| Blade Count | 20 steel blades |
| Spring Count | 24 aerator springs |
| Weight | 29.5 lbs |
As soon as I unboxed the Westinghouse 16-Inch 15 Amp 2-in-1 Corded Lawn Electric, I was struck by its solid build and the sleek black-and-green design that feels sturdy yet lightweight. Holding it in my hands, I noticed how balanced and manageable it is at just under 30 pounds, making maneuvering across my lawn less of a workout.
The 20 steel blades and 24 aerator springs give it a serious look—definitely built to tackle thick thatch and compacted soil. I appreciated the adjustable depth settings; being able to set it from -.5” to +.25” meant I could tailor my dethatching without damaging the grass.
Switching between the blades and aerator was straightforward, thanks to the clear lever system.
Running it felt powerful but not overly noisy, and the 3500 RPM motor did a great job removing debris and loosening soil. The three-angle positions and five depth options let me customize the process, whether I wanted a light aeration or a deep clean.
The foldable handle made storage a breeze, and the 14.5-gallon collection bag kept cleanup quick and simple.
Overall, I found it effective at creating a healthier, more breathable lawn. Plus, the 2-year warranty and lifetime tech support gave me peace of mind that this tool is built to last.
It’s a reliable, user-friendly option for anyone serious about lawn care.
DEKOPRO 15″ Electric Lawn Dethatcher & Aerator, 15 Amp

- ✓ Powerful 15 Amp motor
- ✓ Easy tool switching
- ✓ Large collection bag
- ✕ Slightly heavy for prolonged use
- ✕ Cord may limit mobility
| Motor Power | 15 Amp copper motor |
| Maximum RPM | 3500 RPM |
| Working Width | 15 inches |
| Depth Adjustment Range | -11mm to +10mm |
| Collection Capacity | 40 liters |
| Functionality | 2-in-1 lawn scarifier and dethatcher with adjustable height settings |
You know that frustrating moment when you’re trying to get your lawn looking lush, but the thick thatch layer just won’t budge? I was battling that same issue until I grabbed the DEKOPRO 15″ Electric Lawn Dethatcher & Aerator.
As soon as I turned it on, the powerful 15 Amp copper motor kicked in, and I could feel the deep, vigorous scarifying happening right away.
The 15-inch working width made covering large patches a breeze, so I didn’t waste time going over the same area repeatedly. Switching between dethatching and aerating was surprisingly simple with the 2-in-1 design.
Just a quick toggle, and I was loosening compacted soil and improving fertilizer absorption—definitely a multitasker for seasonal yard care.
The adjustable height settings from -11mm to +10mm let me customize the depth depending on my grass type and the season. I found that the 5-position system gave me just enough control to avoid damaging my lawn while still removing stubborn thatch.
Plus, the 40L collection bag kept the debris contained, saving me from endless raking, which is a huge plus for bigger lawns.
The foldable handle made storage easy, and the double safety switches gave me peace of mind while working. Overall, I was impressed by how quick and efficient this tool was.
It’s reliable, versatile, and handles tough jobs without breaking a sweat, making spring and fall yard work much less of a chore.
What Is Dethatching and Why Is It Important for Lawn Health?
The benefits of dethatching extend beyond immediate lawn health; it also promotes long-term resilience against environmental stresses. For instance, a healthy lawn can withstand drought conditions more effectively, reducing the need for supplemental watering, which in turn conserves water resources. Furthermore, regular dethatching can improve the effectiveness of fertilization and overseeding, leading to a thicker, greener lawn.
Best practices for dethatching include assessing the lawn’s thatch level before proceeding, timing the dethatching appropriately, and ensuring the lawn is adequately watered a day or two before the process to minimize stress. Following dethatching, it’s advisable to reseed and fertilize the lawn to encourage recovery and promote new growth.
What Are the Signs Indicating the Right Time to Dethatch?
Dethatching is a crucial maintenance task for a healthy lawn, and recognizing the right time to do it is important to avoid harming your grass. Here are key signs indicating it’s time to dethatch your lawn:
-
Thick Layer of Thatch: If you notice more than half an inch of thatch—decayed organic matter, including grass clippings, roots, and leaves—it’s time for dethatching. You can measure this by pulling back a small section of grass and assessing the layer.
-
Poor Water Absorption: If water pools on the surface rather than soaking into the soil, it may be due to an excessive thatch layer that prevents moisture penetration.
-
Weak Grass Growth: When grass appears thin, patchy, or unhealthy despite regular watering and fertilization, it can signify that thatch is restricting nutrient flow.
-
Weed Proliferation: A lawn with increased weed growth might indicate that the underlying grass is struggling due to heavy thatch, allowing opportunistic weeds to thrive.
-
Presence of Pests: An overabundance of pests like grubs and insects can often thrive in thatchy environments, indicating that it’s time to take action.
Addressing these signs promptly will help in maintaining a lush, healthy lawn.
When Is the Best Time of Year to Dethatch My Lawn?
The best conditions to dethatch your lawn are influenced by seasonal timing, grass type, and weather conditions.
- Early Spring: This is often considered the ideal time for cool-season grasses to dethatch.
- Fall: For warm-season grasses, early fall is the preferred time to dethatch.
- Moist Soil Conditions: Dethatching is best done when the soil is slightly moist, allowing for easier removal of thatch.
- Grass Health: Ensure your grass is healthy and actively growing before dethatching to promote recovery.
Early spring is ideal for cool-season grasses because they benefit from dethatching during their peak growth period, allowing the lawn to recover quickly. The cooler temperatures and increased moisture in spring help grass establish itself following the dethatching process.
For warm-season grasses, early fall is the best time to dethatch as these grasses are gearing up for their active growth phase. Dethatching at this time allows the lawn to recover before winter dormancy, promoting a healthier lawn in the following spring.
Moist soil conditions are crucial for effective dethatching as they allow the dethatcher to penetrate the soil more easily, minimizing stress on the grass. If the soil is too dry, it can lead to damage and make the dethatching process less effective.
It’s important to ensure your grass is healthy and actively growing before dethatching, as this will help it recover more quickly from the stress of the procedure. A lawn that is weak or stressed may suffer more from dethatching, resulting in longer recovery time and potential damage.
What Weather Conditions Are Most Suitable for Dethatching?
The best conditions to dethatch a lawn involve specific weather and soil moisture levels to ensure effectiveness.
- Late Spring to Early Fall: Dethatching is most effective during the growing season when grass is actively growing.
- Warm Temperatures: Ideal temperatures for dethatching are between 70°F and 90°F, which ensures the grass can recover quickly.
- Moist Soil: Soil should be slightly moist, as this helps the dethatching equipment penetrate the thatch without damaging the grass roots.
- Dry Weather Conditions: It’s best to dethatch on a dry day to prevent the thatch from clumping and making it harder to remove.
- Before Rainy Season: Dethatching just before a rainy period can help the grass recover and fill in any bare spots with new growth.
Late spring to early fall is the ideal time frame for dethatching because the grass is in its prime growth phase, allowing it to quickly heal from the process.
Warm temperatures between 70°F and 90°F promote vigorous grass recovery, making it easier for the lawn to bounce back after dethatching.
Moist soil is crucial as it allows the dethatching equipment to work effectively without causing harm to the grass roots, reducing the risk of stress on the plants.
Dethatching on dry days is recommended to avoid creating clumps of thatch and ensure a cleaner removal process, facilitating better lawn care.
Dethatching just before the rainy season can be beneficial, as the moisture helps the grass recover and encourages new growth to fill any gaps left by the dethatching process.
How Do Moisture Levels Impact the Success of Dethatching?
The success of dethatching a lawn is significantly influenced by moisture levels, and understanding this can lead to optimal results.
- Optimal Moisture Levels: Dethatching is most effective when the soil is moist but not saturated.
- Dry Conditions: Performing dethatching under dry conditions can lead to damage to the grass roots and an ineffective removal of thatch.
- Wet Conditions: Excessively wet soil can make it difficult to operate dethatching equipment and may lead to soil compaction.
- Seasonal Considerations: The best time for dethatching often corresponds with the growing season, which can also be influenced by moisture levels.
Optimal Moisture Levels: When the soil is moist, it allows the dethatcher to easily penetrate the thatch layer without damaging the grass roots. A lawn that is too dry can cause the dethatcher to pull up healthy grass along with the thatch, resulting in bare patches.
Dry Conditions: In dry conditions, the grass becomes brittle, and the thatch layer can harden, making it much more difficult to effectively remove. This can lead to uneven dethatching and may necessitate multiple passes, increasing the risk of harming the existing grass.
Wet Conditions: If the soil is too wet, dethatching can result in soil compaction, which restricts air and water movement to the roots. This can also make it challenging to maneuver equipment, and the thatch may become matted down instead of being lifted and removed.
Seasonal Considerations: Spring and early fall are generally the best times to dethatch, as the grass is actively growing and can recover quickly. Moisture levels during these seasons can vary, so assessing the soil condition prior to dethatching is essential for achieving the best results.
What Tools Should I Use for Effective Dethatching?
To effectively dethatch your lawn, several tools can be utilized, depending on the severity of the thatch and the size of your lawn.
- Manual Dethatcher: This is a simple, handheld tool that resembles a rake with sharp tines designed to pull up thatch. It is best for small areas or light thatch build-up, allowing for greater control and precision during the dethatching process.
- Power Rake: A power rake, or dethatching machine, is a motorized tool that uses rotating blades to cut through thatch. This tool is ideal for larger lawns or severe thatch problems, as it can cover more ground quickly and efficiently while providing a more aggressive dethatching action.
- Vertical Mower: Similar to a power rake, a vertical mower is designed for deep dethatching and often features vertical blades that slice into the soil. This tool is effective for lawns with heavy thatch, as it helps to aerate the soil and promote healthy grass growth.
- Core Aerator: A core aerator removes small plugs of soil and thatch from the lawn, which helps reduce thatch while also improving soil aeration. This tool is particularly beneficial when used in combination with dethatching, as it enhances water and nutrient penetration into the soil.
- Rake Attachment for Lawn Mowers: Some lawn mowers can be equipped with a dethatching rake attachment that drags over the lawn while mowing. This is a convenient option for homeowners who regularly maintain their lawns, allowing them to dethatch as they mow without needing additional equipment.
How Can I Prepare My Lawn for Optimal Dethatching Conditions?
To prepare your lawn for optimal dethatching conditions, follow these essential steps:
-
Timing: The best time to dethatch is during the growing season, typically in early spring or early fall. This allows the grass to recover quickly after the process.
-
Moisture Levels: Ensure the soil is moderately moist but not saturated. Water the lawn a day or two before dethatching to soften the soil, making it easier for the dethatching equipment to penetrate.
-
Mowing: Mow your lawn to a shorter height, approximately 1.5 to 2 inches. This height encourages better dethatching and reduces stress on the grass during the process.
-
Clear Debris: Remove any leaves, sticks, or other debris from the lawn before dethatching. This will allow for a more effective dethatching process and prevent damage to the equipment.
-
Equipment Check: If using a dethatching machine, ensure it is sharp and in good working order. Dull blades can damage healthy grass instead of just removing thatch.
By following these steps, you will create ideal conditions for dethatching and promote a healthier lawn.
Related Post: