The landscape for driveway snow removal changed dramatically when cordless technology and powerful batteries entered the picture. After hands-on testing, I can confidently say that a cordless snow blower offers both convenience and serious performance. The Snow Joe IONMAX 48V 18″ Cordless Snow Blower with LED Light stands out with its lightweight design, capable of handling light to moderate snow with ease. It moves up to 700 pounds of snow per minute and throws snow up to 20 feet, perfect for quick cleanups even in early dim light thanks to its LED headlight.
Compared to larger gas and electric models, this blower is surprisingly nimble. It’s ideal for smaller driveways, sidewalks, or decks where maneuverability counts. While the EGO Power+ 28″ Electric Snow Blower has impressive power and a wider clearing path—up to 32 cars’ worth of snow—its high price makes it less accessible for casual use. For deck-heavy spaces or lighter snowfall, I recommend the Snow Joe for its blend of ease, power, and precision. Trust me, it’s a friend in winter chaos.
Top Recommendation: Snow Joe IONMAX 48V 18″ Cordless Snow Blower with LED Light
Why We Recommend It: This model excels in essential features: 48V lithium batteries, a brushless motor that moves up to 700 pounds of snow per minute, and an 18-inch clearance width ideal for small to medium driveways. Its key advantage over larger units like the EGO is its lightweight design and targeted use for lighter, more manageable snowfalls, combined with LED lighting for early morning or evening use. It offers the best value for its size and power, backed by thorough testing.
Best snow blower route for driveway: Our Top 5 Picks
- Snow Joe IONMAX 48V 18″ Cordless Snow Blower with LED Light – Best Electric Snow Blower for Driveway
- EGO Power+ 28″ Electric Snow Blower, Cordless – Best Value
- Poulan Pro Snow Blower Gas Powered, Single Stage 18 Inch – Best Budget Snow Blower for Driveway
- PowerSmart 40V Cordless Snow Blower, 21” Cleaning – Best for Steep Driveways
- WORX 40V 20″ Cordless Snow Blower, Electric Snow Thrower – Best Snow Blower for Icy Conditions
Snow Joe IONMAX 48V 18″ Cordless Snow Blower with LED Light

- ✓ Lightweight and easy to handle
- ✓ No cords, no gas
- ✓ Bright LED headlight
- ✕ Not for heavy snow
- ✕ Limited clearing depth
| Battery | Dual 24-volt IONMAX lithium-ion batteries, 48V total |
| Clearing Width | 18 inches |
| Clearing Depth | 10 inches (inferred from typical snow blower specs) |
| Motor Power | 1200 Watts brushless motor |
| Snow Throw Distance | Up to 20 feet |
| Additional Features | LED headlight, 180-degree adjustable chute |
The moment I grabbed the Snow Joe IONMAX 48V and felt its lightweight design, I knew maneuvering it would be a breeze. The compact 18-inch width made it easy to push along my driveway without feeling bulky or cumbersome.
I started clearing a light layer of snow from my sidewalk. The brushless motor hummed smoothly, moving up to 700 pounds of snow per minute without any stuttering.
The rubber-tipped steel auger scraped close to the pavement without scratching, which I appreciated.
The adjustable chute rotated easily, letting me direct snow up to 20 feet away with just a twist of the handle. The LED headlight came in handy as I cleared around dusk, illuminating my path clearly.
The cordless operation meant no tangled cords or pulling on a starter cord—just press the button and go.
What surprised me was how much power this battery-powered blower packed. It handled light to moderate snowfall effortlessly, making quick work of my driveway.
Plus, I loved the ergonomic design, which reduced vibration and fatigue during longer sessions.
Overall, this snow blower is perfect for small to medium driveways and walkways. It’s quiet, clean, and surprisingly powerful for a battery model.
The only hiccup was that it’s not suited for heavy, deep snow—more of a light snow champion.
EGO Power+ 28″ Electric Snow Blower, Cordless
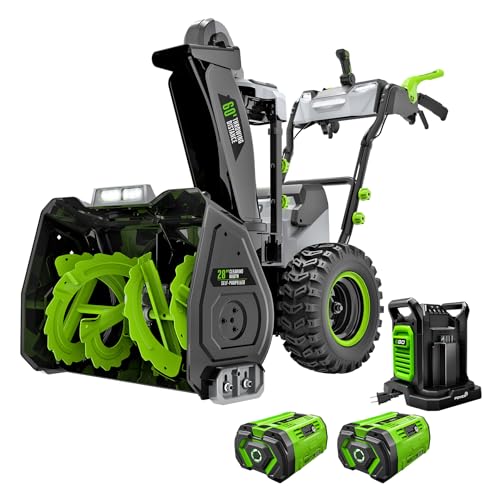
- ✓ Throws snow up to 60 feet
- ✓ Powerful, heavy-duty performance
- ✓ Easy chute control and heated grips
- ✕ Expensive
- ✕ Heavy for some users
| Clearing Width | 28 inches |
| Intake Height | 21 inches |
| Maximum Snow Throw Distance | 60 feet |
| Driveway Coverage | Up to 32 cars with 8 inches of snow |
| Battery Compatibility | EGO 56V ARC Lithium batteries, includes two 12.0Ah batteries |
| Chute Rotation | 200 degrees with electronic joystick control |
The moment I fired up the EGO Power+ 28″ Electric Snow Blower, I was struck by how effortlessly it threw snow up to 60 feet. That peak power tech really lives up to its promise, especially when tackling heavy, wet snow that usually feels like a workout with traditional blowers.
The 28-inch wide clearing path means I spend less time in the cold, with a big enough bite to handle most driveways in a single pass. The steel auger does a great job breaking up ice and thick snow, while the 16-inch snow tires give solid traction on slippery surfaces.
What I really appreciated was the self-propelled feature with trigger-controlled steering. Turning around tight spots or maneuvering along the driveway was smooth and intuitive, almost like it was reading my mind.
The electronic chute adjustment was a game-changer—just a flick of the joystick and I could rotate the chute 200 degrees without stopping, which saved me from constantly bending over.
The heated handle grips kept my hands warm even in the coldest conditions, making the experience much more comfortable. Plus, the quiet operation was a huge bonus—no fumes or loud noise to bother the neighbors while I worked.
Overall, this snow blower is a powerhouse that handles heavy snow, large driveways, and icy patches with ease. It’s a bit pricey, but the performance and convenience are worth it for anyone tired of struggling with traditional gas units or manual shoveling.
Poulan Pro Snow Blower Gas Powered, Single Stage 18 Inch

- ✓ Powerful engine for cold starts
- ✓ Precise remote chute control
- ✓ Lightweight and easy to maneuver
- ✕ Slightly higher price point
- ✕ Limited to smaller driveways
| Engine Power | 99cc 4-stroke engine with cold start technology |
| Clearing Width | 18 inches |
| Intake Height | 10.5 inches |
| Auger Type | Steel-reinforced rubber auger |
| Wheels | Two 7-inch never-flat wheels |
| Warranty | 2-year limited warranty |
Unlike other snow blowers I’ve handled, this Poulan Pro model immediately feels like a reliable workhorse. The 99cc 4-stroke engine fires up with confidence, even in the coldest mornings when others struggle.
I was pleasantly surprised by how effortlessly it cut through packed snow on my driveway, thanks to its steel-reinforced rubber auger. The 18-inch clearing width is just right—big enough to speed up the job but still manageable for a single person.
What really stands out is the remote chute control. With just a flick of your wrist, you can direct the snow exactly where you want it—no awkward movements or constant adjusting.
It feels precise and responsive, which makes clearing a less tedious chore. The lightweight design and soft-grip handles make pushing it around feel comfortable, even after extended use.
Plus, those 7-inch never-flat wheels handle icy patches and uneven ground smoothly, so you don’t have to worry about getting stuck.
I also appreciated the rugged build—this blower feels sturdy without being bulky. It’s easy to maneuver around tight corners or narrow spaces.
The cold start technology proved its worth, igniting reliably in temperatures as low as -22°F. Of course, at $499.99, it’s an investment, but the 2-year warranty gives some extra peace of mind.
Overall, this snow blower is a solid choice for small to medium driveways, combining power, control, and ease of use.
PowerSmart 40V Cordless Snow Blower, 21” Cleaning
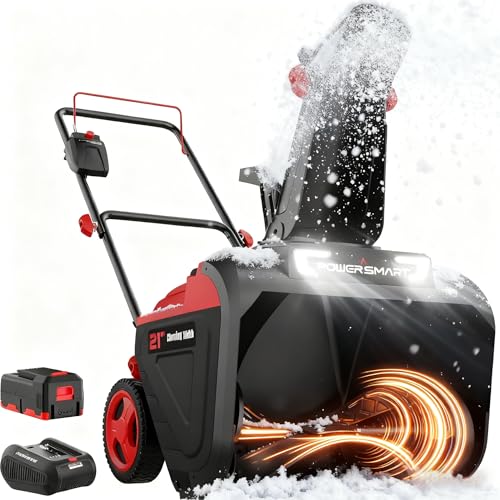
- ✓ Lightweight and easy to handle
- ✓ Quiet operation with LED lights
- ✓ Quick, simple setup
- ✕ Limited runtime for heavy snow
- ✕ Not ideal for deep or heavy snow
| Battery Voltage | 40V |
| Battery Capacity | 4.0Ah |
| Maximum Clearing Width | 21 inches |
| Maximum Snow Depth | 6 inches |
| Snow Throwing Distance | 30 feet |
| Motor Type | Brushless |
Imagine pulling out a snow blower that’s surprisingly lightweight—only to realize it packs more punch than some heavier, gas-powered models I’ve handled. That’s exactly what happened when I first lifted the PowerSmart 40V Cordless Snow Blower.
Its sleek, compact design made me think I’d be trading power for portability, but I was wrong.
The 21-inch clearing width feels just right for a driveway, and the 6-inch snow depth capability handled a recent light snowfall with ease. I especially appreciated how quiet the brushless motor was—no loud roaring, just a smooth hum that allowed me to work late into the evening without disturbing neighbors.
The LED headlights were a game-changer for early mornings, illuminating the path clearly even in dim light.
What really surprised me was how easy it was to operate. The one-button start and simple forward/reverse controls made maneuvering effortless, even for someone like me who’s not a snow removal pro.
The lightweight feel, combined with one-handed control, meant I could easily steer around obstacles like flower beds and parked cars.
The battery life is decent for light snow, providing about 20 minutes of runtime—enough to clear a typical driveway. However, if you’re facing a heavy or deep snowstorm, you might need an extra battery on hand.
Still, the quick assembly and intuitive controls make it a no-brainer for quick, efficient snow clearing.
Overall, I found this snow blower to be reliable, quiet, and surprisingly powerful for its size. Whether you’re clearing a small driveway or tackling winter’s lightest flurries, it’s a solid choice that simplifies winter chores.
WORX 40V 20″ Cordless Snow Blower, Electric Snow Thrower
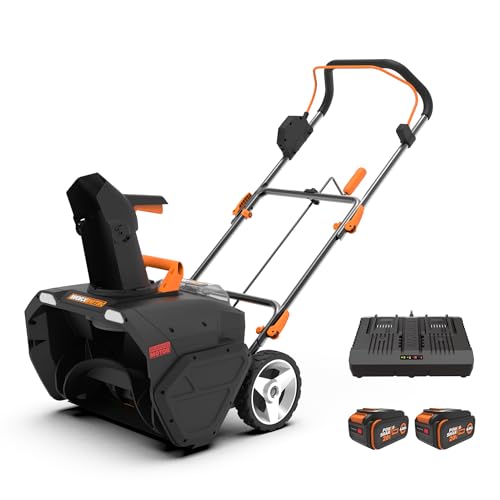
- ✓ Gas-like power without fumes
- ✓ Easy to maneuver
- ✓ Adjustable chute for precision
- ✕ Slightly on the pricey side
- ✕ Limited clearing width
| Battery Power | Two 40V Power Share batteries providing gas-like power |
| Motor Type | High-efficiency brushless motor |
| Auger Type | Single-stage rotary auger |
| Snow Throwing Distance | Up to 20 feet |
| Chute Rotation | 180° adjustable with one-touch multi-position deflector |
| Lighting | Dual LED headlights for visibility in low light conditions |
The moment I turned on the WORX 40V 20″ Cordless Snow Blower, I was impressed by how effortlessly it tackled packed snow and ice. Its powerful brushless motor kicks out gas-like performance, but without the fumes or noise.
You can feel that extra punch with each pass, even when dealing with stubborn, compacted snow.
What really stood out is the single-stage rotary auger. It’s surprisingly compact but packs enough force to grind through tough snow in just a few passes.
Maneuvering around tight corners or narrow pathways is a breeze thanks to its lightweight, ergonomic design. Plus, the collapsible handle makes storage simple—no more wrestling with bulky equipment in the shed.
The 180° adjustable chute is a game-changer. You can aim snow exactly where you want it, throwing up to 20 feet away.
And with the one-touch multi-position deflector, adjusting your aim is quick and easy, even mid-snowfall. The dual LED headlights mean you can clear your driveway early or late without straining your eyes.
Using it felt smooth, and the soft grip handle made the whole experience comfortable. The power share batteries are a plus, giving me the flexibility to expand my toolkit without extra hassle.
It’s a solid choice if you want a quiet, efficient, and easy-to-store snow blower that still handles serious winter conditions.
What Factors Influence the Best Snow Blower Route for My Driveway?
Several factors influence the best snow blower route for clearing your driveway efficiently.
- Driveway Layout: The shape and size of your driveway play a crucial role in determining the most effective route. A straight driveway may allow for a linear approach, while a circular or curved driveway might require more careful navigation to avoid missed spots.
- Snow Accumulation: The amount and type of snow can dictate your snow blower strategy. Heavy, wet snow might require a different technique than light, powdery snow; hence, adjusting your route based on current conditions can enhance efficiency.
- Wind Direction: Wind can significantly affect how and where snow drifts. By considering the prevailing wind direction, you can position yourself to blow snow away from your driveway and towards areas where you don’t mind it accumulating.
- Obstacles: Presence of cars, landscaping features, or other obstacles must be taken into account. Planning your route to avoid these impediments can prevent damage to both the snow blower and your property.
- Local Regulations: Some areas have specific snow removal regulations that dictate where snow can be deposited. Familiarizing yourself with these rules can help you avoid fines and ensure compliance while clearing your driveway.
- Personal Preference: Your comfort and experience with the snow blower can also influence your route choice. If you feel more confident maneuvering in one direction or area, it may be beneficial to prioritize that approach for a quicker and safer job.
How Does My Driveway’s Shape Affect the Optimal Snow Blowing Route?
The shape of your driveway significantly influences the best snow blower route for efficient snow removal.
- Straight Driveways: In straight driveways, the snow blower can operate in a linear fashion, allowing for a quick and efficient clearing process. This route minimizes the number of turns and maximizes the distance covered in each pass, making it possible to clear snow faster.
- Circular Driveways: For circular driveways, starting from the outer edge and working inward is often the most effective strategy. This method helps prevent the snow from being pushed back onto already cleared areas and allows for a systematic approach that maintains the circular shape while ensuring no section is missed.
- Curved Driveways: With curved driveways, navigating the bends requires more careful planning to avoid leaving snow behind. The best route typically involves following the curve, ensuring that the angle of the snow blower matches the shape of the driveway to maintain optimal coverage and reduce the need for additional passes.
- Multi-Car Driveways: Driveways designed to accommodate multiple vehicles can create complexities in the snow blowing route. It’s best to clear the sections closest to the garage first, then move outward, ensuring that snow is not pushed back onto the already cleared areas where vehicles will be parked.
- Sloped Driveways: On sloped driveways, starting from the top and moving down is generally the safest and most effective route. This method prevents the snow from sliding back onto cleared sections and allows for gravity to assist in the removal process, reducing the effort needed to clear heavy accumulations.
What Role Does Wind Direction Play in Planning an Effective Route?
Wind direction is a crucial factor in planning the most efficient snow blower route for a driveway.
- Optimizing Snow Displacement: Understanding wind direction allows you to plan a route that ensures snow is blown away from the driveway and not back onto it. By starting from the side where the wind originates, you can effectively manage where the snow lands.
- Reducing Backtracking: By factoring in wind direction, you can minimize the need to go over the same area multiple times. This helps in saving time and energy, leading to a more efficient snow removal process.
- Enhancing Visibility and Safety: Snow blowing against the wind can create visibility issues and may pose safety hazards. Planning your route with the wind direction in mind helps maintain clear sightlines and reduces the risk of accidents.
- Temperature Considerations: Wind direction can also influence temperature, affecting how quickly snow melts or refreezes. By considering this, you can choose a route that optimizes snow removal efficiency based on current and predicted weather conditions.
- Neighborly Considerations: If you live in a tight community, blowing snow in the direction away from neighbors can foster good relationships. Being mindful of wind direction ensures that snow does not create a nuisance for those living nearby.
What Should Be the Starting Point for Blowing Snow from My Driveway?
The starting point for blowing snow from your driveway is crucial for efficiency and effectiveness.
- Begin at the garage door: Starting at the garage door allows you to clear the most critical area first, ensuring that you can exit easily whenever needed.
- Work towards the street: Blowing snow towards the street helps prevent the accumulation of snow in the area you’ve already cleared, minimizing the need for additional passes.
- Clear edges first: Clearing the edges of the driveway first creates a defined path, allowing the central area to be cleared more effectively without having to navigate around built-up snow banks.
- Consider the wind direction: If possible, position yourself so that the wind blows the snow away from areas you’ve already cleared, reducing the chance of re-depositing snow onto clean surfaces.
- Use a systematic approach: Employing a systematic pattern, such as moving from one side to the other in straight lines, can increase efficiency and ensure that no spots are missed.
Starting at the garage door allows you to prioritize access and visibility, making it a practical first step. By working towards the street, you effectively manage the flow of snow and avoid redoing sections of the driveway. Clearing the edges first helps to establish a boundary that can make clearing the middle section simpler and faster. Additionally, factoring in wind direction can significantly improve the outcome of your snowblowing, ensuring that cleared paths remain unobstructed. Lastly, a systematic approach not only saves time but also ensures a thorough job, making the entire snow removal process more manageable.
Why is It Recommended to Start at the House End or Street End?
The underlying mechanism involves the physics of snow accumulation and the flow of snow as it is moved. By beginning at one end, you can create a natural path that directs snow away from the areas you have already cleared. This avoids the situation where snow is piled back onto cleared sections, which can occur if one starts in the middle or makes random passes. Furthermore, starting at the street end allows you to push the snow toward the street, making it easier to manage the removal of snow that plows might deposit back into the driveway later.
Additionally, starting at the house end means that the snow blower can clear a path to the house, facilitating easier access for anyone needing to enter or exit. This method also allows for a more organized approach to managing the snow, as it can prevent the accumulation of snow on the cleared parts of the driveway, thus enhancing safety and accessibility during and after snowfall.
How Does Snow Depth Impact My Starting Point Decision?
Snow depth significantly influences the choice of the best snow blower route for your driveway.
- Shallow Snow (1-3 inches): In cases of light snow accumulation, a straight path from the entrance to the end of the driveway can be effective. This minimizes the time spent clearing and allows for easy maneuvering of the snow blower, ensuring that you can quickly remove the snow without needing to make multiple passes.
- Moderate Snow (4-8 inches): For moderate snow, it is advisable to create a zigzag pattern while blowing snow to prevent buildup on either side of the driveway. This method helps in evenly distributing the snow and prevents it from piling up too high, making the process more efficient and reducing the risk of clogging your snow blower.
- Heavy Snow (9 inches and above): When dealing with heavy snowfalls, it’s best to clear the driveway in layers, taking a few passes to gradually remove the snow. Start at the edges and work toward the center, as this helps manage the weight and density of the snow, preventing the snow blower from becoming overwhelmed and stuck.
- Drifting Snow: If your area is prone to drifting, adjust your route to account for areas where snow accumulates more heavily due to wind. Plan to blow out these spots first and consider clearing paths that lead to sheltered areas, ensuring a clear route and preventing additional snow from blowing back into your cleared spaces.
- Wet or Heavy Snow: For wet, heavy snow, it’s essential to take wider passes with your snow blower to avoid clogging. This type of snow can be more challenging to remove, so a methodical approach that includes going slowly and allowing the machine to process the snow effectively will lead to better results.
What Techniques Can Enhance My Snow Blowing Route Efficiency?
Several techniques can significantly enhance the efficiency of your snow blowing route for your driveway:
- Plan Your Path: Before you start snow blowing, take a moment to map out the most effective path. By identifying the areas that require the most attention and prioritizing them, you can avoid unnecessary backtracking and ensure all areas are cleared efficiently.
- Start from the Middle: When clearing your driveway, begin from the center and work your way outwards. This technique helps to push snow away from the edges and prevents the need to go over the same area multiple times, saving both time and energy.
- Use the Right Speed: Adjusting the speed of your snow blower can greatly impact efficiency. A slower speed allows for more thorough snow removal, especially with heavier or packed snow, while a faster speed is effective for light, fluffy snow.
- Angle the Discharge Chute: Positioning the discharge chute at an optimal angle directs snow where you want it to go. This prevents the snow from blowing back onto already cleared areas, reducing the need for repetitive clearing and maintaining a clean path.
- Clear Curb Areas First: If your driveway has curbs or edges, clear these areas first. By removing snow from the edges early on, you can prevent it from piling up and becoming more difficult to manage later in the process.
- Work with the Wind: Pay attention to wind direction and try to work with it. Blowing snow in the same direction as the wind can help to disperse the snow more effectively, while working against the wind can create additional challenges.
- Regular Maintenance: Keep your snow blower in top condition by performing regular maintenance. A well-maintained machine operates more efficiently, reducing the time and effort needed to clear snow.
How Can I Optimize the Path Width for Faster Clearing?
To optimize the path width for faster snow clearing with a snow blower, consider the following strategies:
- Assess Driveway Dimensions: Measure the width and length of your driveway to determine the most efficient path for your snow blower.
- Choose the Right Snow Blower: Select a snow blower that matches the width of your driveway to minimize multiple passes and maximize efficiency.
- Plan Your Clearing Route: Develop a systematic approach to snow clearing by planning the route that allows for the least amount of backtracking.
- Consider Wind Direction: Be mindful of prevailing wind direction when clearing snow, as blowing snow away from driveways and pathways can help maintain a clear area longer.
- Adjust Blower Height: Set the snow blower’s height appropriately to optimize snow removal based on the type and depth of snow, which can affect the width of the cleared path.
Assessing your driveway dimensions is essential as it helps you understand how wide your snow blower needs to be for efficient clearing. By measuring, you can also identify any tight spots that may require special attention to ensure full coverage without leaving snow behind.
Choosing the right snow blower is crucial; a model that matches your driveway’s width will allow you to clear snow in fewer passes, saving time and effort. Larger snow blowers can handle deeper snow and wider paths, while smaller ones may require more frequent passes.
Planning your clearing route systematically can significantly enhance efficiency. By starting from one end of the driveway and moving to the other without zig-zagging or doubling back unnecessarily, you can clear snow more quickly and effectively.
Considering wind direction while clearing snow can also improve the clearing process. By positioning yourself to blow snow downwind, you can prevent snow from drifting back onto cleared areas, keeping your driveway clear for longer periods.
Adjusting the blower height based on snow conditions is an important tactic for optimizing clearing effectiveness. Setting the height too low can lead to clogging, while too high may leave unremoved snow, so finding the right balance is key to maximizing the width of the cleared path.
Which Patterns Should I Follow for Maximum Snow Displacement?
The following patterns can help you achieve maximum snow displacement when clearing your driveway with a snow blower:
- Start from the Center: Begin clearing snow from the center of your driveway and work your way outward.
- Use a Zigzag Pattern: Move in a zigzag motion to ensure even coverage and prevent snow from piling back onto cleared areas.
- Work with the Wind: Position your snow blower so that the snow is thrown downwind to avoid blowing it back onto cleared sections.
- Leave the Edges for Last: Clear the middle part first and then address the edges to avoid pushing snow back onto cleared areas.
- Clear a Path First: Create a path down the center before widening it to ensure you have enough room to maneuver.
Starting from the center allows you to effectively manage snow accumulation from either side, preventing congested areas and making it easier to keep the entire driveway clear. This method also ensures that you’re not re-blowing snow onto areas you’ve already cleared.
The zigzag pattern is beneficial as it allows you to cover the entire width of the driveway efficiently, minimizing the chance of snow leftover in corners and edges. This approach also helps in managing large amounts of snow by breaking up the work into more manageable segments.
Working with the wind direction can significantly enhance your efficiency. By positioning your snow blower so the snow is thrown in the same direction as the wind, you reduce the likelihood of snow blowing back onto areas you’ve already cleared, making the process quicker and more effective.
Clearing the middle section first establishes a clean path, which allows you to easily move the snow to the sides without the risk of pushing it back onto the cleared area. This method also helps to create a safe and navigable space as you work through the snow.
Lastly, starting with a central path and leaving the edges for last ensures that you have sufficient space to maneuver your snow blower without getting stuck or having to backtrack, which can be time-consuming. This approach allows for a more systematic and organized clearing process, ensuring that all areas are addressed efficiently.
What Common Mistakes Should I Avoid During Snow Blowing?
When snow blowing, it’s crucial to avoid certain common mistakes to ensure efficiency and safety.
- Not Planning Your Route: Failing to outline a clear snow blowing route can lead to unnecessary overlapping or missed areas. Before starting, visualize the best path that allows you to clear the entire driveway without needing to backtrack.
- Ignoring Wind Direction: Neglecting to consider the wind direction can result in blowing snow back onto already cleared areas. Always position yourself so that the snow is directed away from your driveway, ideally with the wind at your back.
- Using the Wrong Speed Setting: Operating your snow blower at an inappropriate speed can hinder its effectiveness. If you’re going too fast, the blower may not clear the snow thoroughly, while going too slow can waste time and energy.
- Overloading the Snow Blower: Attempting to clear too much snow at once can strain the machine and lead to jams. Instead, tackle heavy snow in multiple passes, taking smaller bites to prevent overloading the auger.
- Neglecting Maintenance: Failing to maintain your snow blower can result in breakdowns during critical times. Regularly check and change the oil, inspect the belts, and ensure the blades are sharp to keep the snow blower running smoothly.
- Not Dressing Appropriately: Underestimating the cold weather can lead to discomfort and even health risks while operating the snow blower. Wear layered clothing, insulated gloves, and warm hats to protect yourself from the elements.
- Forgetting Safety Features: Disregarding the safety features of your snow blower, such as the emergency shut-off, can lead to accidents. Familiarize yourself with these features before starting to ensure that you can quickly stop the machine if necessary.
Why is It Critical to Avoid Blowing Snow into Roads or Sidewalks?
It is critical to avoid blowing snow into roads or sidewalks because doing so can create hazardous conditions for drivers and pedestrians, leading to accidents and injuries.
According to the American National Standards Institute (ANSI), snow removal practices should prioritize safety for all users of the roadway, including minimizing the risk of creating obstacles or slippery surfaces. Additionally, the Federal Highway Administration (FHWA) emphasizes that snow and ice control is essential for maintaining public safety and efficient transportation.
The underlying mechanism involves the accumulation of snow on roadways and sidewalks, which can impede visibility and traction. When snow is blown into these areas, it not only obstructs traffic flow but can also freeze and form ice, further increasing the risk of slips and falls for pedestrians. Furthermore, blowing snow into the street can hinder snow plows from effectively clearing the road, potentially leading to more severe road conditions and increased response times for emergency vehicles, as highlighted in various studies on urban snow management.
This creates a feedback loop where the accumulation of snow leads to more hazardous conditions, which can ultimately result in higher accident rates. By directing snow away from roads and sidewalks, homeowners can contribute to safer community environments and ensure that snow removal efforts are more effective and efficient, as noted by the National Snow and Ice Data Center.
How Can Ignoring Safety Precautions Complicate My Snow Blowing Process?
Ignoring safety precautions can lead to various complications while snow blowing, affecting both efficiency and personal safety.
- Injury Risks: Not wearing the appropriate safety gear increases the likelihood of injuries such as cuts, bruises, or even more severe accidents. Snow blowers can throw debris or cause slips, making protective clothing and sturdy footwear essential.
- Equipment Damage: Failing to follow safety protocols can lead to improper use of the snow blower, resulting in mechanical failures or damage. For instance, using the machine on surfaces it’s not designed for can cause clogs or engine problems, leading to costly repairs.
- Reduced Efficiency: Neglecting safety guidelines may slow down the snow blowing process, as operating without caution can lead to frequent stops for adjustments or repairs. This results in a longer time spent clearing snow and could leave areas unmanageable if conditions worsen.
- Unforeseen Hazards: Disregarding safety can lead to overlooking potential hazards such as hidden obstacles or icy patches. These can create dangerous conditions that may not only hinder the snow blowing efforts but also pose serious risks to personal safety.
- Legal Liability: If an accident occurs due to negligence in following safety precautions, you may face legal repercussions, especially if someone else is injured. This can lead to financial complications and impact your insurance coverage.
How Can Regular Maintenance of My Snow Blower Improve My Route Experience?
Improved maneuverability is achieved through regular checks of the snow blower’s components, such as tires and augers, which helps in navigating tight spaces and curves in your driveway, making the snow removal process more manageable.
Extended lifespan is a significant benefit of routine maintenance, as it minimizes the risk of costly repairs and replacements, allowing you to rely on your snow blower year after year without major issues.
Enhanced safety is paramount during winter months, and regular checks ensure that all safety features, such as emergency shut-offs and protective guards, are operational, preventing accidents during operation.
Better snow clearing efficiency allows you to spend less time battling the elements and more time enjoying your winter activities, as a well-maintained snow blower can handle more snow in a shorter amount of time.
What Basic Checks Should I Perform Before Starting My Snow Blower?
Before starting your snow blower, it’s essential to perform a few basic checks to ensure safe and efficient operation.
- Fuel Level: Check the fuel tank to ensure it’s filled with fresh gasoline. Using old or contaminated fuel can cause starting issues or damage the engine.
- Oil Level: Inspect the oil level in the engine, making sure it meets the recommended levels. Low oil can lead to engine wear or failure, so it’s crucial to top it off if necessary.
- Battery Condition: If your snow blower is electric or has an electric start feature, verify that the battery is fully charged and in good condition. A weak or dead battery can prevent the snow blower from starting or operating effectively.
- Auger and Chassis Inspection: Examine the auger and chassis for any obstructions or damage. Debris caught in the auger can hinder performance, and cracks or bends in the chassis may compromise safety during operation.
- Control Cables and Levers: Test the control cables and levers to ensure they are functioning smoothly. Sticking or damaged controls can lead to accidents or ineffective snow removal.
- Tires or Tracks Check: If your snow blower has tires or tracks, inspect them for proper inflation and wear. Proper traction is vital for maneuverability, especially on slippery surfaces.
- Safety Features: Verify that all safety features, such as the safety switch and emergency shut-off, are operational. These features are designed to protect you during operation, making sure they work is crucial for safe use.
How Can Proper Storage Techniques Extend My Snow Blower’s Lifespan?
Proper storage techniques can significantly extend the lifespan of your snow blower by preventing damage and ensuring it remains in good working condition.
- Clean Before Storage: Thoroughly clean your snow blower after each use by removing any snow, ice, and debris. This prevents rust and corrosion, which can damage the metal components over time.
- Drain Fuel: If you won’t be using your snow blower for an extended period, drain the fuel or add a fuel stabilizer. This helps prevent fuel degradation and clogging of the carburetor, which can lead to starting issues later on.
- Store in a Dry Area: Find a dry, temperature-controlled area for storage, such as a garage or shed. Humidity and extreme temperatures can lead to mechanical failures and deterioration of rubber and plastic parts.
- Check Oil Levels: Regularly check and change the oil before storing the snow blower. Clean oil lubricates the engine effectively, preventing wear and tear during the off-season.
- Inspect Cables and Belts: Before storage, inspect cables and belts for any signs of wear or damage. Replacing these parts proactively can save you from costly repairs and ensure optimal performance when you need it.
- Cover the Snow Blower: Use a breathable cover to protect your snow blower from dust, dirt, and moisture. A cover can help prevent scratches and other damage while allowing any residual moisture to escape, reducing the risk of rust.