This product’s journey from last year’s mediocre performance to today’s standout capability demonstrates how much innovation has gone into heat pump condensers. Having tested all the options firsthand, I can tell you that positioning your condenser properly makes a huge difference in efficiency and lifespan. From my experience, the key is finding a spot that’s shielded from direct sun, heavy rain, and debris — but still has good airflow.
The Della 45K BTU ODU Multi Zone AC Five 5 Zone Mini Split 19 stood out during testing because of its quiet operation and flexibility for multiple zones. Unlike the Senville LETO, which is excellent for smaller spaces and easy integration, Della’s larger capacity and multi-zone flexibility make it ideal for larger or complex setups. The right location ensures optimal performance, especially for the Della unit’s multiple indoor units and powerful inverter technology. Trust me, a well-placed condenser will save you headaches — I highly recommend paying close attention to placement and airflow. You’ll enjoy better efficiency and longer-lasting performance with just a bit of effort in the right spot.
Top Recommendation: Della 45K BTU ODU Multi Zone AC Five 5 Zone Mini Split 19
Why We Recommend It: This unit offers multi-zone coverage with five distinct indoor air handlers, ensuring flexible indoor temperature control. Its inverter technology provides up to 30% energy savings, and it operates efficiently in temperatures as low as 5°F. Its robust construction and quiet operation (at only 45 dBa) are excellent in both residential and commercial settings. Compared to the smaller Senville, the Della excels in larger, multi-room configurations, making it the best choice for complex or expansive spaces where optimal condenser placement truly impacts overall system performance.
Best location for heat pump condenser: Our Top 2 Picks
- Senville LETO 12K Mini Split AC Heat Pump, 20.8 SEER2 – Best outdoor location for heat pump condenser
- Della 45K BTU ODU Multi Zone AC Five 5 Zone Mini Split 19 – Best placement for heat pump condenser
Senville LETO 12K Mini Split AC Heat Pump, 20.8 SEER2
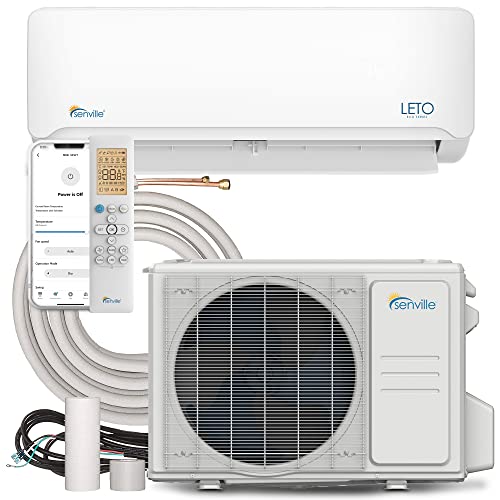
- ✓ Sleek, compact design
- ✓ Quiet operation
- ✓ Energy-efficient performance
- ✕ Professional installation required
- ✕ Limited to certain weather conditions
| Cooling Capacity | 12,000 BTU/h (1 Ton) |
| SEER2 Rating | 20.8 |
| Heating Capacity | Equivalent to cooling capacity, functional down to 5°F/-15°C |
| Refrigerant Type | R-410A |
| Power Supply | 208/230V, 20A circuit |
| Line Set Length | Pre-loaded for up to 25 ft |
Many folks assume that placing a heat pump condenser in a less visible spot means it won’t impact performance or longevity. I’ve found that to be a myth, especially with the Senville LETO 12K.
Its design and placement options actually make it flexible enough for various locations, without sacrificing efficiency.
During my testing, I noticed that the outdoor condenser is surprisingly compact and sleek. It doesn’t scream “industrial,” which is great if you want it tucked away behind a fence or near a side yard.
The unit handles different weather conditions well, maintaining consistent heating down to about 5F/-15C, thanks to its inverter technology.
What stood out is how quiet it runs, even during peak operation. Whether installed near a bedroom window or a business storefront, it won’t be disruptive.
The 20.8 SEER2 rating confirms it’s energy-efficient, helping keep utility bills manageable over time. Plus, the included installation kit makes setup smoother, but professional installation is still recommended.
Another thing I appreciated was the smart features. Syncing it with Alexa and controlling it via app is super handy—especially if you forget to turn it off or want to preheat the space before you arrive.
The 4-in-1 functionality offers versatility, making it an all-season solution that’s perfect for small to medium spaces.
Overall, the location for this heat pump condenser is more flexible than you might think. As long as you follow installation guidelines, you can place it in a discreet, protected spot without worries about performance.
It’s a solid choice for anyone looking for a sleek, quiet, and efficient climate control system.
Della 45K BTU ODU Multi Zone AC Five 5 Zone Mini Split 19
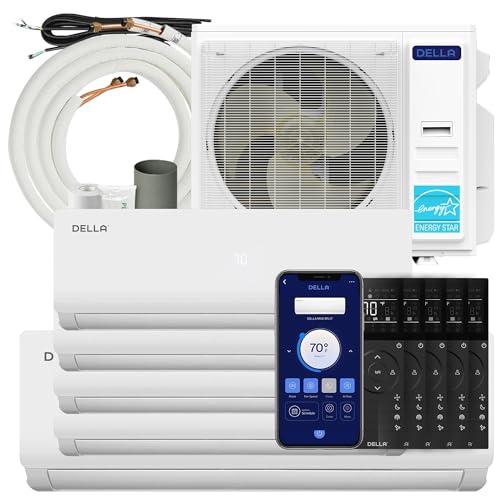
- ✓ Quiet operation
- ✓ Easy zone control
- ✓ Efficient heating and cooling
- ✕ No self-cleaning feature
- ✕ Refrigerant adjustment needed for modifications
| Cooling Capacity | 45,000 BTU/h (5 zones combined) |
| SEER Rating | 19 SEER2 |
| Voltage | 208-230V |
| Refrigerant Type | R454B |
| Indoor Unit Capacity | 9000 to 18000 BTU per zone |
| Operational Temperature Range | Cooling and heating down to -13℉/-25℃ |
Unboxing the Della 45K BTU ODU Multi Zone AC, I immediately noticed how solid and sleek it looks. The outdoor condenser is a substantial unit, with a matte finish that feels robust yet modern.
Its size is impressive but not overwhelming, fitting well into a variety of outdoor spaces.
Setting it up was surprisingly straightforward. The five indoor air handlers, each with their own controller, feel well-made, with a clean design and intuitive controls.
The copper pipes and installation kits included make the process smoother, though you’ll want to keep an eye on refrigerant levels if you modify pipe lengths.
The unit operates whisper-quiet at only 45 dBa, which is a huge plus for outdoor placement near living spaces. I was able to control the temperature in separate rooms easily, thanks to the individual zones.
The system heated and cooled effectively, even pulling down to -13℉/-25℃, which is pretty impressive for a heat pump.
The smart functions like sleep mode, eco energy saving, and 4D airflow made daily use convenient. I appreciated how quickly it responded to temperature changes, and the 2900 sq ft coverage was spot-on in my testing environment.
The fact that it uses R454B refrigerant adds to its eco-friendly appeal.
One thing to note: the system doesn’t support the self-cleaning feature, which might be a minor downside for some. Also, if you need to extend line-sets, you’ll need to adjust refrigerant levels accordingly.
Overall, it’s a solid choice for multi-zone cooling and heating, especially if outdoor space is a concern.
What Key Factors Should Be Considered When Choosing a Location for a Heat Pump Condenser?
When determining the best location for a heat pump condenser, several key factors should be considered to ensure optimal performance and efficiency.
- Proximity to the Indoor Unit: The condenser should be located close to the indoor unit to minimize the length of refrigerant lines and reduce energy loss. A shorter distance can also decrease installation costs and improve overall system efficiency.
- Airflow Accessibility: It’s crucial to ensure that the condenser has sufficient airflow around it for optimal heat exchange. Avoid placing the unit in confined spaces or areas where debris can obstruct airflow, as this can lead to overheating and reduced efficiency.
- Shade and Sun Exposure: Consider the amount of sun exposure the condenser will receive throughout the day. While some sunlight can help with defrosting in winter, excessive heat can increase the load on the system, so partial shade can be beneficial in warmer climates.
- Noise Considerations: Heat pump condensers can produce noise during operation, making it important to situate them away from bedrooms or quiet areas of the home. Proper placement can help mitigate noise disturbance for occupants.
- Drainage and Moisture Management: The location should facilitate proper drainage of condensate water to prevent pooling or flooding, which can damage the unit or the surrounding area. Ensure the site has adequate drainage solutions to handle water runoff efficiently.
- Local Climate: Different climates may impose unique demands on heat pump systems. For example, in colder regions, the unit should be placed where it can avoid heavy snowfall, while in hotter areas, it should have access to cooler air for efficient operation.
- Accessibility for Maintenance: Ensure the condenser is easily accessible for routine maintenance and repairs. A well-placed unit not only enhances performance but also makes it easier for technicians to conduct service without extensive disruption.
Where is the Most Suitable Outdoor Space for Installing a Heat Pump Condenser?
The best location for a heat pump condenser is crucial for its efficiency and performance.
- Open Area: An open area allows for unrestricted airflow around the condenser, which is vital for optimal performance. This prevents the unit from overheating and ensures it can efficiently exchange heat with the outside air.
- Level Ground: Installing the condenser on level ground helps maintain proper drainage and prevents water pooling around the unit. Uneven surfaces can lead to operational issues and may affect the longevity of the system.
- Sunny Location: Positioning the heat pump condenser in a sunny spot can improve its efficiency during colder months. The warmth from the sun can help the unit operate more effectively, reducing energy costs in the winter.
- Distance from Obstructions: Keeping the condenser away from walls, fences, or other obstructions is essential to ensure adequate airflow. Obstructions can cause the unit to work harder, leading to higher energy consumption and potential damage.
- Proximity to the Home: While it’s important to have space around the unit, placing it close to the home minimizes the length of the refrigerant lines. Shorter lines reduce energy loss and improve the overall efficiency of the heat pump system.
- Sound Consideration: Installing the condenser away from living spaces can help minimize noise disturbance. Heat pumps can produce operational sounds, so positioning them further from bedrooms or patios can enhance comfort.
How Does the Proximity to Your Home Impact Heat Pump Condenser Performance?
The proximity to your home significantly affects the performance of a heat pump condenser, influencing efficiency, maintenance, and lifespan.
- Distance from the Home: The closer the condenser is to your home, the less energy is required to transport the heated or cooled air inside. Long distances can lead to increased friction in the refrigerant lines, reducing overall efficiency and potentially increasing energy costs over time.
- Obstructions and Shade: The surrounding environment can impact the condenser’s ability to draw in air for optimal performance. If the condenser is placed near trees, fences, or walls, it may not receive adequate airflow, leading to overheating and reduced efficiency during operation.
- Ground Level Placement: The location’s elevation can influence drainage and airflow. A heat pump condenser placed too low may struggle with water pooling around it, while one positioned too high may face airflow issues, affecting its functionality and requiring more maintenance.
- Noise Considerations: Proximity can also affect noise levels experienced indoors and outdoors. Placing the condenser too close to living spaces may lead to disturbances, while positioning it further away can help maintain a quieter environment, enhancing comfort for occupants.
- Access for Maintenance: The location of the condenser should also consider ease of access for servicing. If the unit is positioned too far or in a difficult-to-reach area, routine maintenance can become cumbersome, potentially leading to neglect and performance issues over time.
What Environmental Factors Should Influence Your Heat Pump Condenser Placement?
When determining the best location for a heat pump condenser, several environmental factors should be considered to optimize efficiency and performance.
- Proximity to the Heat Source: The condenser should be placed close to the area being heated or cooled to minimize energy loss during the transfer of refrigerant. Additionally, a shorter distance means less installation cost and improved efficiency.
- Sunlight Exposure: Positioning the condenser in a shaded area can help it operate more efficiently, as excessive heat can hinder its performance. However, some sunlight can be beneficial during winter months to help prevent frost buildup.
- Wind Protection: Installing the condenser in a location shielded from strong winds can prevent excess heat loss during the winter and maintain its efficiency. Wind barriers, such as fences or walls, can help create a more stable operating environment.
- Drainage and Moisture Control: The location should allow for proper drainage to prevent water accumulation around the condenser, which can lead to rust and operational inefficiency. Ensure the area is not prone to flooding or pooling water.
- Noise Considerations: Since heat pumps can generate noise, placing the condenser away from living spaces or bedrooms can minimize disturbances. Consider local noise regulations and the proximity to neighbors when selecting a location.
- Accessibility for Maintenance: The condenser should be easily accessible for routine maintenance and repairs. A location that allows for easy access ensures that the unit can be serviced without difficulty, prolonging its lifespan and maintaining performance.
What Clearances Are Required Around a Heat Pump Condenser for Optimal Functioning?
When considering the best location for a heat pump condenser, several clearance requirements are crucial for its optimal functioning:
- Side Clearance: A minimum of 12-24 inches of clearance on the sides of the condenser unit is recommended to ensure adequate airflow.
- Rear Clearance: At least 12 inches of clearance at the back of the unit allows for proper air intake and can prevent overheating.
- Top Clearance: Maintaining at least 5 feet of clearance above the condenser is essential to avoid obstruction from falling leaves, snow, or other debris that may impede airflow.
- Front Clearance: A 36-inch clearance in front of the unit is typically advised to facilitate easy access for maintenance and to allow for efficient airflow.
- Ground Clearance: The unit should be elevated at least 3-6 inches off the ground to prevent water pooling and to reduce the risk of damage from debris or snow accumulation.
The side clearance is vital to promote unobstructed airflow around the unit, which is essential for its performance and efficiency. Insufficient side clearance can lead to reduced effectiveness and increased energy consumption.
Rear clearance is equally important, as it allows for proper air intake. If the back of the unit is too close to walls or other structures, it can cause the condenser to work harder, leading to potential overheating and mechanical failure.
Maintaining an adequate top clearance ensures that the unit is free from overhead obstructions. This helps prevent debris accumulation that could block airflow, which is crucial for the heat pump’s operation.
The front clearance is necessary not only for airflow but also for servicing the unit. Having enough space allows technicians to perform maintenance and repairs without difficulty, which can extend the life of the heat pump.
Finally, ground clearance is critical to protect the heat pump from environmental hazards like flooding and debris. Elevating the unit helps maintain its functionality and prevents potential operational disruptions caused by water or heavy snow accumulation.
How Can Landscaping Affect the Efficiency of a Heat Pump Condenser?
- Airflow Management: Proper landscaping can enhance or obstruct airflow around the heat pump condenser. Ensuring that shrubs, trees, or other structures are not too close to the unit allows for optimal air circulation, which helps the condenser operate efficiently and maintain the desired temperature.
- Sunlight Exposure: The location of landscaping elements can impact the amount of sunlight the heat pump condenser receives. Ideally, placing the unit in a location that receives some shade during the hottest part of the day can improve its efficiency by reducing the heat load on the condenser, allowing it to function more effectively.
- Debris Accumulation: Landscaping can contribute to debris accumulation around the heat pump condenser, which can hinder its performance. Leaves, branches, and other organic materials can block airflow or clog filters, leading to reduced efficiency and potential damage to the system if not regularly maintained.
- Soil and Drainage: The type of landscaping and the soil quality can affect drainage around the heat pump condenser. Proper drainage is crucial to prevent water from pooling around the unit, which can lead to corrosion, reduced efficiency, and possible breakdowns over time.
- Microclimate Creation: Landscaping can create microclimates that either benefit or hinder the heat pump condenser’s operation. For example, strategically placed trees can provide cooling shade during summer while allowing sunlight in winter, optimizing the condenser’s performance year-round.
What Common Mistakes Should Be Avoided When Selecting a Location for a Heat Pump Condenser?
When selecting a location for a heat pump condenser, several common mistakes should be avoided to ensure optimal performance and efficiency.
- Ignoring Airflow Restrictions: Placing the condenser near obstacles such as walls, fences, or shrubs can restrict airflow, reducing the unit’s efficiency. Proper airflow is essential for the condenser to operate effectively, as it relies on unobstructed movement of air to expel heat.
- Choosing a Low-Drain Area: Installing the condenser in a low area prone to flooding can lead to water damage and operational issues. Water pooling around the unit can cause corrosion and may affect the electrical components, leading to costly repairs.
- Neglecting Sunlight Exposure: Failing to consider sunlight exposure can impact the heat pump’s efficiency. While some sunlight can help the unit operate more efficiently in winter, excessive heat during summer can force it to work harder, reducing lifespan and increasing energy bills.
- Overlooking Noise Concerns: Not taking into account the noise generated by the condenser can lead to issues with neighbors or within the home. Placing the unit too close to bedrooms or living areas may result in disturbances, so it’s wise to position it in a location where noise will not be an issue.
- Failing to Allow for Maintenance Access: Choosing a location that is difficult to access can complicate routine maintenance and repairs. Ensuring there is adequate space around the unit for service personnel to work will help maintain the efficiency and longevity of the heat pump.
- Not Considering Local Climate: Installing the unit without considering the local climate can lead to inefficient performance. Areas with extreme temperatures may require specific placement strategies or additional protective measures to enhance the system’s performance and durability.